
I am SO excited to share this tutorial with you! This is my very first tutorial. I will be showing you how to make a post it note holder that would be great for your desk or a wonderful gift for those business savvy fathers, mothers or teachers in your life!!! I do hope that I have made this tutorial simple and to the point! Any feedback would be greatly appreciated and I would LOVE to see what some of you come up with using this tutorial so leave a comment with a link to your creation!! Here I go!
Supplies:
Supplies:
-81/5 x 11 sheet of cardstock (I am using Sahara Sand)
-Your favorite DSP (I used To the Nines) cut at 3 3/8 x 4 3/8 (Front, under Post it holder) & 3 1/5 x 2 1/5 (Pen Holder)
-If you'd like to cover you pen you'll need a piece for that and you'll have to measure it out as pen sizes vary!
-Tombow Glue
-Bone Folder
-Craft Knife and Ruler or paper trimmer
-A Pen and Post-it Notes

Start by scoring the short side of your 8 1/2 x 11 sheet of paper at 2 1/2" and at 6".
I marked my score lines in black so they would be easy to see!

Turn your paper and Score again at 3 1/4", 7 3/4" and 10"
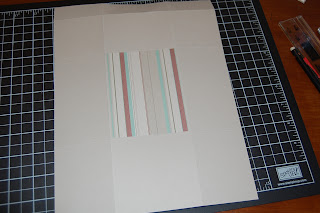
Glue your 3 3/8 x 4 3/8 sheet of DSP in the middle box, it should fit just inside the score lines.
 On the opposite side, you will be cutting a 3 1/8" long line 1" down from the score line.
Make sure your paper is as shown with the 1" score line as the top of your paper!

Using a ruler or a paper trimmer cut your 3 1/8" line. It should be about a 1/4" from each sides score line.

Slip the back of your Post it notes into the cut on the side with the DSP.

Turn your paper over and fold all of the creases using your bone folder.

It should now look like this, now fold the other score lines towards the back of the post it notes.

Slip the long end into the opening on the short end. Turn over and voila post it holder! Now to add the pen holder on the top!

Score your the short side of your 3 1/2 x 2 1/2 piece of DSP every 1/2" or at 1/2", 1", 1 1/2", 2".
Go over creases with your bone folder.

put a little bit of Tombow Glue on one end and adhere to make a square as shown below.

This should be how yours looks, now put a little bit of Tombow Glue on the side with the fold and adhere to the top of the holder.

Hopefully this is how yours looks!

Wrap pen in DSP, embellish a little and your done! Easy, cute and usable!! I hope you liked my tutorial!

Thanks for stopping by and happy stampin!
Well done! TFS, I can't wait to do myself!
ReplyDeleteI love this! I am going to make some of these!
ReplyDeleteThey may make cute soccer gifts! (with a soccer motif of course!)Stephanie
Jenna: This is really cute! I usually skip the idea of post-it note holders, but I not only love this--I'm going to CASE it! Thanks very much for sharing.
ReplyDeleteJenna, I LOVE it! I created a scratch pad holder a few weeks ago and this will look AWESOME sitting next to it! Thanks for the GREAT tutorial! I plan on CASEing it but promise to give you credit. You deserve it 'cuz this rocks!
ReplyDeleteThis is awesome! Thanks so much for sharing. I can't wait to make one tomorrow. Gotta sick daughter, so I will stay home with her tomorrow while her daddy goes to church. I might get a little play time for me. :)
ReplyDeleteLoretta
Jenna.. this is too cute! Can't wait to try it myself. Thanks for the awesome tutorial!
ReplyDeleteWhat a great first tutorial. Keep up the great work! I will be making this ASAP! :)
ReplyDeleteJenna - Great tutorial. I think even I can follow it! Can't wait until I get into my new craft room so I can try some of these great ideas! Thanks for sharing.
ReplyDeleteJenna, I found your instructions simple and very easy to use. I love this twist on the post-it holders and am going to make them for our teacher gifts. thanks for the idea and the tutorial!
ReplyDeleteOk, I managed to leave my comment on the wrong post. Maybe I need blog 101. I really do love this and look forward to trying it myself.
ReplyDeleteGood job on your first tutorial. I can't wait to try this project.
ReplyDeleteHello Blogging Star Sister. Cant wait to try this out. These are great for gifts. Especially because its Teacher Appreciation.
ReplyDeleteWOW, that ISSSSSS an awesome tutorial!
ReplyDeleteSUPAH PROJECT, TOO!!!!!!!!
LOVE this Post-It note holder Jenna! I can just see one on my desk now! Guess I better get busy if I really want to see that huh? (grin)
ReplyDeleteJenna -
ReplyDeleteGreat job! I love the post it note holder. And your tutorial was very easy to follow. Never thought of putting a pen holder on one, but hey, what do we always go looking for when we need to leave a note?! Great idea!
Jenna
ReplyDeleteThanks so much for sharing. As soon as I saw your very easy to follow tutorial, I whipped one up. Will put it on my blog tomorrow.
http://www.stampnscrap4fun.typepad.com
You did a great job on the tutorial. I was able to follow along and it came out just like yours. Thanks for the ideas. I found your link as I was doing the Royal Tour.
ReplyDeleteyour tutorial rocks Jenna - found you on SC and I have now made several of these for gifts and the local craft fair!! TFS, how fabulous of you! I put my own twist on it, and just love them!! *STAMPIN HUGS* Alex
ReplyDeleteI love this idea and you are a joy with directions. You made them so clear. Thank you. I subscribing to your Blog and have my fingers crossed for more wonderful ideas from you. Thanks again!
ReplyDeleteHi - I'd like to feature this on A Cherry On Top on NSD 2014. I hope this will be ok. I will credit and link back to your post.
ReplyDeletethanks for this great tutorial! I'll surely be making a few of these!
ReplyDeleteClelia