 I saw this the other day on my bloggin' sister Marisol's blog and just had to try it! So here is my version, you can view the directions from Unique Designs by Lisa. They both made some really cute ones using Cheep Talk! For mine I used Stampin Up's Just Buzzin' by Stamp Set and a retired fathers day greeting. I used To the Nines DSP and used the following colors, Kraft, Yoyo yellow, Chocolate Chip and Summer Sun(flowers).
Monday, May 25
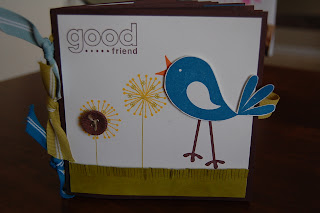
Inspired by Sol
I saw this the other day on my bloggin' sister Marisol's blog and just had to try it! So here is my version, you can view the directions from Unique Designs by Lisa. They both made some really cute ones using Cheep Talk! For mine I used Stampin Up's Just Buzzin' by Stamp Set and a retired fathers day greeting. I used To the Nines DSP and used the following colors, Kraft, Yoyo yellow, Chocolate Chip and Summer Sun(flowers). Sunday, May 24
Scrapbook in a day!


SCRAPBOOK IN A DAY!
When: NEXT SUNDAY, MAY 31st @ 1:00 p.m. - 3:00 p.m.
Where: My house!
Cost is $17
I'm also offering 10% off of the purchase of a 6"x6" scrapbook for those that attend!
Bring a friend and receive $2 off of the class price! Just please RSVP by May 29th by email or phone, seats are limited!
614-302-5247
We will be making 20 6"x6" scrapbook pages! There are enough to fill a 6"x6" scrapbook and make a wonderful gift or keepsake. This class features the Sunshine Garden Simply Scrappin' Kit on page 164 in your catalog. These pages are perect for that vacation you want to remember or those spring photos! I will be providing all materials and will have snacks and refreshments. Invite your friends, everyone is welcome whether or not you've attended a Stampin Up event or have any paper crafting experience.
Sunday, May 17
Masculine Card Challenge!
Hey there fellow stampers!
Here is a card I just submitted for the Late Night Stampers Masculine Card Challenge! I had saw someone somewhere stamp this truck on DSP and I just loved it and had to try it so this is what I came up with, don't you love the 'rope' in back! I used Crystal Effects for the windows, I often draw a blank when it comes to 'man' cards but I finally felt the drive to do one and I'm pretty proud of what I came up with...what'd ya think?

Thanks for stopping by, I hope you all enjoy what's left of the weekend!!
Happy Stampin'!
Thursday, May 14
Welcome to Blog Tour #5 Stop #4!!
I hope you enjoyed the Blog Tour. The links are gone for this tour, so I hope you bookmarked all of your favorites. Our next tour will be July 27 and 28. It will coincide with the launch of our yearly catalog, so be sure to stop back here in July for updates!I
I featured the super fun Stampin’ Up set Party Hearty!! Here is my 1st card girly, fun and simple! Other then stamping all I did was the faux stitching!

My 2nd Card is another fun birthday card using lots of punches and the stamp-a-ma-jig was a must for this one!

This is a post-it holder that I came up with, I think this makes a great gift for just about anyone! You can view the tutorial here.

Of course I needed to include a masculine card! I’m not sure if I like this one too much, I always struggle a bit with ‘man’ cards!

Last but not least a Scrapbook page! These adorable kids are my babies who all share the same October 2nd birthday! I also used the Rainbow Sherbet DSP for this page which by the way Stampin up is offering buy 3 get one free on all Designer Series Papers!!


Thank you so much for stopping by, be sure to subscribe to my blog and come back soon!
Tuesday, May 12
Good Friend Paper Bag Scrapbook Class THIS WEEKEND!!!
Good Friend Paper Bag Scrapbook Class!

You are invited to enjoy an evening of stamping at my house
to make this adorable paper bag scrapbook!
Friday, May 15th 8:00 p.m.
or
Saturday, May 16th 8:00 p.m.
Cost is $17 or FREE with a $35 Stampin Up order!
I will be providing all materials and will have snacks and refreshments. Everyone is welcome whether or not you've attended a Stampin Up event or have any paper crafting experience.
I'd LOVE to see you there!
Bring a friend!!
Just please RSVP by May 14th by email or phone
614-302-5247


Aren't my babies adorable!! I'm giving this to my husband, so he can pull us out whenever he needs a little lift and a smile!


This amazing class was created by Candice Anderson and is only available to Stampin' Up Demonstrators! Sound fun? Ask me how you can become a demonstrator and start your own business for only $75!!! Don't wait, this offer is only good until May 31st! I would love to have you join my team!!
Thanks for stopping by
Happy Stampin'!!
Saturday, May 9
Stampin' Fun!
I have been busy the last couple days finishing up my mom's mothers day gift, doing grad cards and working on something for the "MISS" May Swappers Group I am in. I am in the Trendy Trees Swap. Here are 2 cards I made for that, which should I do for my swap?

I think this one is my favorite, I used Pink Pirouette, Kiwi Kiss, Whisper White and Basic Brown. Urban Garden DSP, Eyelet Punch, Scallop Oval Punch, Small Oval Punch, Square Punches and Photo Corner punch...whew...lots of punches! I just got the gorgeous whisper white organza ribbon, I love it! Including the Trendy Trees Stamp Set I also used the Oval All set.

This is the other card I made as another possible for the swap. Still using Pink Piroette and Whisper White and Riding Hood Red instead of Kiwi Kiss. I used my circle punches, eyelet, scallop, small and wide oval punches. I finished it off with some whisper white 1/4" grosgrain ribbon. I used the trendy trees wheel on this one with the Trendy Trees Set.

I made this desk post-it holder to go with my Moms Mothers Day gift that I showed on my last post. You can see my tutorial for this here.
 Last but not least this card is for my husbands cousin that is graduating from the University of North Texas. I cased this card completely from a card I saw on SCS you can see it here, I just changed out the colors. I used Glorious Green, Whisper White and Basic Black and the Great Grads Stamp set.
Thanks for checking out my blog today!
Happy Stampin'!
Thursday, May 7
My Mama's Gift
Mothers Day is quickly approaching! Are you ready?

This is what I have made for my mom for Mothers Day! I bought the desk set tutorial from Becky Roberts you can view and purchase hers here. I added DSP to the back of mine and lined the inside as well. I am going to make one of my post it holders to match too. I am also giving her a bunch of misc. cards that I have so she will be prepared for whatever occasion comes her way! Now if I can just be patient and wait to give it to her!


I used the retired Spring Flowers DSP and Spring Bouquet Punch. Current items include the Chocolate Chip corduroy buttons and the half pearls from stampin' up's pretties kit, scallop oval punch, eyelet punch and oval punch. So Saffron 5/8" grosgrain ribbon and Choclate Chip 1/4" ribbon. Cameo Coral, Mellow Moss & So Saffron Cardstocks.
Thanks for stopping by!
Happy Stampin'!
Wednesday, May 6
Bluer then Blue
I needed a larger stash of masculine cards, so this is one I came up with using the Party Hearty Stamp Set and Brocade Blue DSP from the level 1 Hostess paper pack. I also used Brocade Blue & Brilliant Blue Card stock. Brocade Blue Brads and Brilliant Blue Classic Ink.

I love monochromatic cards they are one of my favs! I hope you all are having a wonderful Wednesday. Thanks for stopping by!
Happy Stamping!!
Tuesday, May 5
What a Great Day!
Its been so beautiful here in Ohio, I love spring!! Flowers are blooming, birds are chirping, the smell of freshly cut grass! Hmm...can you tell I am having a good day! I woke up this morning on my own, you see usually either my 2 year old or my 5 year old are standing beside my bed staring at me until I open my eyes. lol! So its a little refreshing when I have a head start on them and a cup of tea before the diaper changes begin! I also have a Stampin' Up order coming in today!!! yay!! I have a feeling today is going to be a great day!


I am off to enjoy my day taking the kids outside to play and waiting for the UPS man to come!!
Happy Stampin'!!
Monday, May 4
I'd like to introduce....
Late Night Stampers Bloggin' Stars Group #2
You all may have noticed my new makeover! I have also added some friends on my sidebar I'd like to mention! Click on there names to check out their blogs! They are all very talented and have some amazing ideas and mountains of inspiration!

You all may have noticed my new makeover! I have also added some friends on my sidebar I'd like to mention! Click on there names to check out their blogs! They are all very talented and have some amazing ideas and mountains of inspiration!
We are all in Bloggin' Stars Group #2 which was formed through the Late Night Stampers Group! I am so thrilled to be a part of this group, we are all committed to supporting each other in our blogging adventures! I know a few encouraging words sure can do ALOT!!
Take Care and Happy Stampin'
Friday, May 1
Post it holder Tutorial

I am SO excited to share this tutorial with you! This is my very first tutorial. I will be showing you how to make a post it note holder that would be great for your desk or a wonderful gift for those business savvy fathers, mothers or teachers in your life!!! I do hope that I have made this tutorial simple and to the point! Any feedback would be greatly appreciated and I would LOVE to see what some of you come up with using this tutorial so leave a comment with a link to your creation!! Here I go!
Supplies:
Supplies:
-81/5 x 11 sheet of cardstock (I am using Sahara Sand)
-Your favorite DSP (I used To the Nines) cut at 3 3/8 x 4 3/8 (Front, under Post it holder) & 3 1/5 x 2 1/5 (Pen Holder)
-If you'd like to cover you pen you'll need a piece for that and you'll have to measure it out as pen sizes vary!
-Tombow Glue
-Bone Folder
-Craft Knife and Ruler or paper trimmer
-A Pen and Post-it Notes

Start by scoring the short side of your 8 1/2 x 11 sheet of paper at 2 1/2" and at 6".
I marked my score lines in black so they would be easy to see!

Turn your paper and Score again at 3 1/4", 7 3/4" and 10"
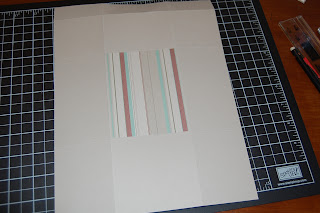
Glue your 3 3/8 x 4 3/8 sheet of DSP in the middle box, it should fit just inside the score lines.
 On the opposite side, you will be cutting a 3 1/8" long line 1" down from the score line.
Make sure your paper is as shown with the 1" score line as the top of your paper!

Using a ruler or a paper trimmer cut your 3 1/8" line. It should be about a 1/4" from each sides score line.

Slip the back of your Post it notes into the cut on the side with the DSP.

Turn your paper over and fold all of the creases using your bone folder.

It should now look like this, now fold the other score lines towards the back of the post it notes.

Slip the long end into the opening on the short end. Turn over and voila post it holder! Now to add the pen holder on the top!

Score your the short side of your 3 1/2 x 2 1/2 piece of DSP every 1/2" or at 1/2", 1", 1 1/2", 2".
Go over creases with your bone folder.

put a little bit of Tombow Glue on one end and adhere to make a square as shown below.

This should be how yours looks, now put a little bit of Tombow Glue on the side with the fold and adhere to the top of the holder.

Hopefully this is how yours looks!

Wrap pen in DSP, embellish a little and your done! Easy, cute and usable!! I hope you liked my tutorial!

Thanks for stopping by and happy stampin!
The Inkcredibles Stamp Club Project!
My friend and fellow demonstrator Sherri came up with this project for her Stamp Club, which I LOVE being in! She always comes up with awesome projects and it is just so much fun!!


 After doing this project, I fell in love with the Parisian Breeze Designer Series Paper. It was gorgeous!! I love the file folder we made as well, how cool would it be to have one for all of the different occasions....a girl can dream!! I am getting together this evening with some girlfriends to stamp so hopefully I'll have some cool things to share tomorrow!! Until then....
Happy Stamping!!
Subscribe to:
Posts (Atom)