Showing posts with label DSP To the Nines. Show all posts

Monday, January 11

bot love note

Happy New Year!  I hope everyone had a wonderful holiday and wish you an even better new year!  I'm sorry I've been MIA for the past few months, my family moved to Florida recently and we have been getting settled and enjoying the holidays and sunshine!  I'm back at it so keep checking back for new ideas and inspiration!
Here is a super easy little notecard I made to put in my sons lunchbox for school.  I love the little robots in this set and I think he'll enjoy getting a special note at lunch!


STAMP SET:  Lots of Bots,
CARDSTOCK:  To the Nines Designer Series Paper, Sahara Sand
ACCESSORIES:  Ticket corner punch, Old Olive Classic Ink, Earth Elements Brads


Happy Stampin'
Jenna

Thursday, May 14

Welcome to Blog Tour #5 Stop #4!!

I hope you enjoyed the Blog Tour. The links are gone for this tour, so I hope you bookmarked all of your favorites. Our next tour will be July 27 and 28. It will coincide with the launch of our yearly catalog, so be sure to stop back here in July for updates!I
I featured the super fun Stampin’ Up set Party Hearty!! Here is my 1st card girly, fun and simple! Other then stamping all I did was the faux stitching!
My 2nd Card is another fun birthday card using lots of punches and the stamp-a-ma-jig was a must for this one!
This is a post-it holder that I came up with, I think this makes a great gift for just about anyone! You can view the tutorial here.
Of course I needed to include a masculine card! I’m not sure if I like this one too much, I always struggle a bit with ‘man’ cards!
Last but not least a Scrapbook page! These adorable kids are my babies who all share the same October 2nd birthday! I also used the Rainbow Sherbet DSP for this page which by the way Stampin up is offering buy 3 get one free on all Designer Series Papers!!
Thank you so much for stopping by, be sure to subscribe to my blog and come back soon!

Friday, May 1

Post it holder Tutorial


I am SO excited to share this tutorial with you! This is my very first tutorial. I will be showing you how to make a post it note holder that would be great for your desk or a wonderful gift for those business savvy fathers, mothers or teachers in your life!!! I do hope that I have made this tutorial simple and to the point! Any feedback would be greatly appreciated and I would LOVE to see what some of you come up with using this tutorial so leave a comment with a link to your creation!! Here I go!
Supplies:
-81/5 x 11 sheet of cardstock (I am using Sahara Sand)
-Your favorite DSP (I used To the Nines) cut at 3 3/8 x 4 3/8 (Front, under Post it holder) & 3 1/5 x 2 1/5 (Pen Holder)
-If you'd like to cover you pen you'll need a piece for that and you'll have to measure it out as pen sizes vary!
-Tombow Glue
-Bone Folder
-Craft Knife and Ruler or paper trimmer
-A Pen and Post-it Notes
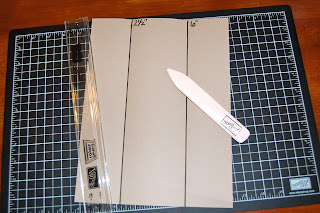
Start by scoring the short side of your 8 1/2 x 11 sheet of paper at 2 1/2" and at 6".
I marked my score lines in black so they would be easy to see!
Turn your paper and Score again at 3 1/4", 7 3/4" and 10"
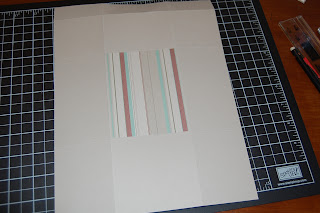
Glue your 3 3/8 x 4 3/8 sheet of DSP in the middle box, it should fit just inside the score lines.
On the opposite side, you will be cutting a 3 1/8" long line 1" down from the score line.
Make sure your paper is as shown with the 1" score line as the top of your paper!
Using a ruler or a paper trimmer cut your 3 1/8" line. It should be about a 1/4" from each sides score line.
Slip the back of your Post it notes into the cut on the side with the DSP.
Turn your paper over and fold all of the creases using your bone folder.
It should now look like this, now fold the other score lines towards the back of the post it notes.
Slip the long end into the opening on the short end. Turn over and voila post it holder! Now to add the pen holder on the top!
Score your the short side of your 3 1/2 x 2 1/2 piece of DSP every 1/2" or at 1/2", 1", 1 1/2", 2".
Go over creases with your bone folder.
put a little bit of Tombow Glue on one end and adhere to make a square as shown below.
This should be how yours looks, now put a little bit of Tombow Glue on the side with the fold and adhere to the top of the holder.
Hopefully this is how yours looks!
Wrap pen in DSP, embellish a little and your done! Easy, cute and usable!! I hope you liked my tutorial!
Thanks for stopping by and happy stampin!

Monday, March 16

My Husbands Birthday!!

Today is my husband, William's Birthday! What's even greater is that today he is on his way home from Afghanistan!! What a great birthday present! Our kids and I miss him soo much and are just so excited to see him! He'll only be home for a week to take care of me and the kids when I get a minor surgery but I'll take it!!
This is the card I made for him. The picture looks way lighter then it really is, it is actually Always Artichoke and Sahara Sand. I used the To the Nines Designer Series Card-stock, I folded it over to show the other great side and did some heavy distressing around the edges! I did a little stitching with the hemp twine and tied a little on the 'b' from the 'Party Hearty' stamp set. I cut out my b and got the middle with my 3/4" punch and cut out a piece of the same DSP to put in its place. I also used the 1 3/4" punch for the larger Sahara Sand Circle and I used my Always Artichoke marker for the images and my stamp-a-ma-jig to line up the sayings. I wrapped up some chocolate in the same DSP, tied it with the retired SU rope twine and I made a tag with the Sale-a-bration set 'Yummy'. Now hopefully he doesn't get a chance to check my blog on his way home!!